There are some great reasons why you would want to spray Pond Shield  epoxy rather than squeegee or roll it on. Learning how to spray epoxy is not difficult to do either. It takes some patience, the correct tools and an assistant.
Since you are actually building a pond, let’s assume you have the patience. You will also have to decide if you have an area large enough to spray epoxy paint. This is important because Pond Shield is not sprayed with a normal, hand held paint sprayer. The epoxy is just too thick, even if you thin it some.
So the type of spray machine you will need is an airless rig that can most likely be rented from a local tool rental store. Now because you will be using one of these, this is where the total area to be sprayed comes into play. The set up and cleaning of these types of machines take some time, not to mention the machine and the hose will cause you to loose some of the Pond Shield you have purchased.
I would recommend that if you consider spraying the epoxy, that you have enough area for at least 8 quart and a half kits and then purchase a minimum of a 3-gallon kit (which equates to 8 quart and a half kits). Any less material for a spray job and you will be wasting your time and material.
So let’s assume you have enough area to spray. Which airless spray machine do you rent or purchase (in the case of a professional installer)? Bigger is always better, but there are some minimum requirements for a spray machine that you have to abide by.
Operating Pressure – 3000 – 3500 working psi minimum. This means that the machine should operate in this range. If the machine is rated for 3000 psi maximum, you may find that the operating pis is somewhere in the 1500 psi area. That pressure will never do.
Spray Tip – This is the part of the spray gun where the epoxy exits the machine. If the spray tip is too small, the psi that the machine operates at will be impeded and not enough coating will exit the gun to do the job properly. The spray tip should be a minimum of .023 to .027. I personally try and find the bigger tips work better. The more volume you can move, the easier it is to cover your project.
Fluid Hose – Typically there are two types of hose, both measured in inside diameter, 3/8” and 1/2. Again, the need is for volume, then try and get the large inside diameter hose.
Gas or Electric – Either type will work fine. I do find that gas machines tend to be larger in terms of the operating pressure and such but you should check the machine specifications before you rent.
So now we know there is enough area to be sprayed and we have picked out the proper machine. What is the assistant for? Well when it comes to spraying epoxy and you are going to be the trigger man, you will want to continuously spray without stopping. Being an exothermic material the epoxy will want to heat up as it cures and airless spray machines have a tendency to further this heating process as the fluid lines are charged. So with that said, you will probably not have enough time to stop spraying and mix additional material yourself, nor will you have the time to change from epoxy to solvent to clean the machine when you are finished.
Your assistant should be well versed in the timing for mixing new epoxy and having it ready at the same time you need it. You, as the person spraying the epoxy should not be waiting for your assistant to finish mixing materials and likewise your assistant should not be waiting for you to finish spraying the epoxy. This timing is essential for the sake of the machine. You do not want the epoxy hardening up in the machine while you wait, nor do you want epoxy starting to cure in a bucket while the assistant waits for you.
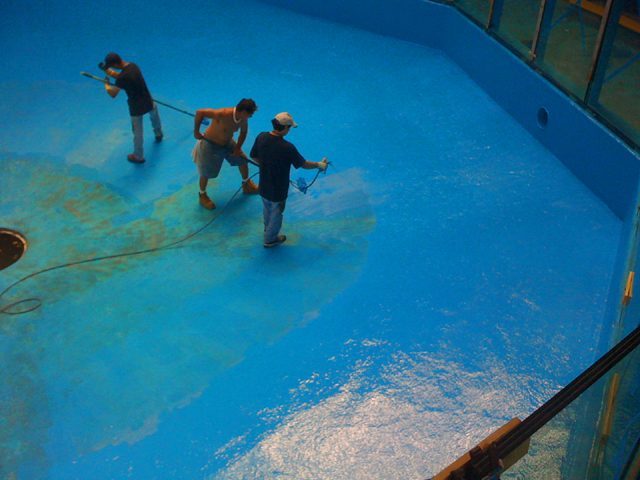
Now that all of the logistics are handled, let’s talk about the actual epoxy spraying process. Spraying epoxy is not that difficult and you can quickly get used to the manner in which you should do it. The first thing you want to do is wear a respirator. Yes, Pond Shield epoxy is non toxic, but the small coating particulates that will be floating in the air are not something you will want in your lungs, so protect yourself. Any good painter will tell you this too.
You may also consider safety glasses as well because of the same reason. There is bound to be some bounce back of epoxy from the surface being sprayed and you do not want that in your eyes either.
The first thing you should do is purge or pre-clean the spray machine of contaminants. This is done by spraying denatured alcohol through the machine for a few minutes. This denatured alcohol can be sprayed into a separate bucket and used later for cleaning the machine. Acetone will work as well, but it is always best to check with the owner’s manual of the machine for proper cleaning methods.
Now that the system has been purged, your assistant will load a fresh batch of Pond Shield epoxy. Thinning the epoxy paint is crucial to the operation of the machine, so you may wish to speak to a support technician at Pond Armor who will be happy to help you with a proper recipe before starting. Be sure to have all of your spray machine specifications handy before the call.
Initially the material that you spray will be mostly denatured alcohol, so purge this off with the properly mixed Pond Shield epoxy into a different bucket than the one you just pre-cleaned the machine with. As soon as you see good epoxy coming from the machine you can move to the work area and begin.
The spray tip on the gun will either have a flat fan pattern or a round funnel pattern. This will not make much of a difference for the type of spray job you are doing but will tend to designate how close you hold the spray gun to the surface of the pond.
Hold the spray gun somewhere between 12 and 18 inches to start. This distance will vary depending on the type of pattern the gun sprays. Typically, the funnel type of pattern feels like a lot more epoxy is being delivered at one time, so you will probably end up holding the spray gun further away and you perform a stroke.
The other thing that will affect this distance is the volume of epoxy being released from the machine. If you have a machine that delivers 4000 psi and pretty large spray tip, then you’ll have a lot more material being released, so the distance again, will be a bit further away from the surface.
The trick to spraying is moving your hand across the surface in one even stroke, keeping the gun the same distance away from the surface. The speed at which you move through this stroke will also be dictated by the volume of epoxy being released. Pond Shield epoxy can be sprayed down at 10 mils thickness in one stroke, so try and run a stroke and then stop for a moment to measure the thickness of the epoxy with the gauge. If the coating is at 10 mils, then your distance away from the surface and your stroke speed are perfect. If not, then adjust accordingly. If the coating was thinner than 10 mils, you may have to move closer as well as slow your stroke speed down.
A caution should be mentioned here. If you lay the coating down thicker than 10 mils, you may experience sagging. The same can be said, if the epoxy is thinned too much. The main problem here is that you may not initially experience this sagging right away. This may happen after you have moved on to another location to spray. Sagging is an aesthetic issue and if it bothers you, you will have to clean that up later and possibly touch up those areas.
Immediately after you have sprayed all areas satisfactorily, you can begin the cleaning process. This means that your assistance will switch from epoxy to a solvent like denatured alcohol, acetone or methyl ethyl ketone (MEK). The acetone or MEK should only be used for cleaning afterwards and not in the pre-cleaning stage. Spray the solvent through the lines thoroughly to ensure no epoxy residue remains. Uses brushes and such to clean all of the machine’s moving parts, pick up tube and spray gun. Afterwards, drain the hose of excess fluid before returning it.
The next day you will be ready to inspect and touch up the coating. Keep in mind that even if the job was perfect today, it is not likely to be perfect tomorrow. Concrete has a way of letting coatings settle in and there may be places to touch up before you fill the pond with water. Always inspect your surface and tough up as needed.