 With so much research being done at this time of year, I thought an article about the application of a pond leak coating might be an interesting topic. If you’re a professional pond installer that has used epoxies before, then you probably already know a great deal about the application process.
However, if you are a DIY (do it yourselfer), you might not have ever tried applying Pond Shield Epoxy before.
No problem, I will cover all of the bases surrounding pond leak coatings here. Let’s assume that the concrete is already prepared and ready to go.
What tools do you have for applying an epoxy sealer? Some pond epoxies are pretty thin in nature and all they take to apply is a roller and maybe a paint brush. But others, that are designed to not only waterproof, but provide a certain amount of strength will generally be thicker in nature. Pond Shield Epoxy, for instance is thick like grease.
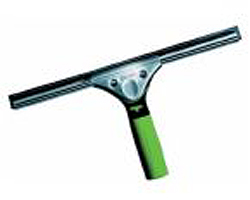
Because of this, you probably wear your arm out just rolling the epoxy. That is why I prefer to use a rubber window squeegee on the epoxy initially. Using a squeegee will allow me to control the thickness of the material better than with a roller. Generally a roller will allow the epoxy to build up.
You do not want the roller to build up or everything will become gooey and sticky. But with a squeegee, you can adjust how much pressure you apply to the application and this in turn, will make measuring the thickness of the material a lot easier.
I have heard of people trying to apply the coating with a paint brush alone. The problem with just using a brush is that the bristles offer no resistance to the coating itself and trying to control the thickness will be virtually impossible.
The only time I use a brush to apply epoxy is when I am touching up, cutting in a waterline or working the uneven surface of a waterfall. I will even use one when I cut in around any plumbing.
The important thing to remember when applying a pond epoxy coating for the first time is to read all of the instructions first. If at that time you do not understand anything about the process, you should ask and clarify. It is hard to find yourself in the middle of a job and not understand why something is going wrong.
For one thing, if you are irritated, you probably will not be thinking clearly, so solutions will not present themselves as easily as they would any other time. However, if you read everything and have all of your tools handy, the job can go smoothly and without a hitch.
Getting back to the actual application process, you should remember to only mix what you will actually be able to use within the pot life of the material. Epoxies are not forgiving when it comes to time. Epoxies will not care if you have your pond coated or not.
Epoxies will harden up in the container you mixed them in just as easily as they will on your pond. You are on the clock once you have mixed the epoxy. Now is not the time to take a lunch break.
I have been on many job sites where the installer watches me demonstrate the application process to them. The one thing they are all amazed at is the coverage. More times than any, when I pour the Pond Shield into the pond to work with, I hear them say, “There is no way that is going to go 60 square feet”.
Then I whip out the squeegee and spread the material out. I squeegee up the walls and along the floor, moving from a corner outwards. I use the roller to smooth out squeegee marks as I go and test the thickness of the epoxy with the gauge here and there.
If the coating appears too thick, I pull it tighter. If it is too thin, I pull some back to that area. What ends up happening is I spend about fifteen minutes pulling and rolling the epoxy and when I am done, the Pond Shield has been applied at 60 square feet.
Now I have also been on job sites where the surface area was so rough that there would be no way to get the coating to cover like that. In those cases, a decision has to be made that concerns how to properly prepare the surface. In some cases, the application process itself is changed and we either switch to the rough surface application method or spray the Pond Shield. Using the rough surface application method involves thinning the epoxy more than you would if you were to apply it with a squeegee.
It also means applying the pond epoxy coating in two thinner coats to build up to the minimum thickness of 10 mils. Spraying on the other hand, make easy work of a rough surface because you can apply the coating in one single coat (most of the time) with minimal effort.
Once everything is applied you’re done right? Wrong! Do not be fooled here. A good pond coating application always ends with a thorough inspection of the coating. I mean what happens if there was a small void in the concrete somewhere? Overnight, this void could have sucked up some of the epoxy and left a gap.
A gap is a hole in the coating. No matter how you slice it and hole in the coating is a potential leak. It doesn’t matter if you have put three coats on Pond Shield or any other product on. If you miss a spot, you will more than likely experience a leak. You must look at every single square foot of the surface area and correct any flaws found, it pays to inspect. Now I have seen some funky situations before. I have seen a wooden holding tank appear to be flawless, yet leak like a sieve when it’s filled. This is an interesting conundrum. If the coating looks flawless, why and how would it leak?
Does anyone know? Let’s say the holding tank is 8 feet long by 4 feet high by 4 feet wide. The water weight of that would be over 7000 pounds! Let’s say that the corner seams were not properly fastened and structurally, they were weak.
It is very conceivable that when the tank is full, the weight of the water would push the walls outward causing small hairline gaps to form in the seams. When this happens, the water would leak out until the weight resided and the seams closed again.
This can happen with concrete block walls in a pond too if they are not build properly. This is why if you have a leak, you need to check the coating AND the structure. Think about what is taking place when there is water in the pond.
If the water leaks down to a certain point, that is usually an indication of what level the leak is at. That is where you should start looking and correct the problem. I cannot stress more that if you have a leak, it will most likely be from something you missed.
A lot of people do not want to hear that. Either they cannot see the problem or in some cases ego might play a roll. Unfortunately, it’s difficult to think that the perfect looking job you just did could be caused by something as trivial as a small missed spot.
Hopefully though, you can now be better equipped to install that coating better and know what to look for before it causes you trouble. I think that being prepared is always a great vantage point to start any project from.