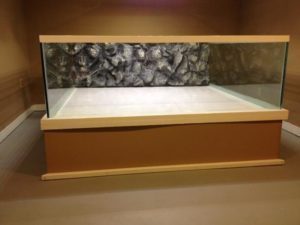
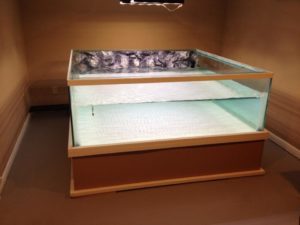
 I recently built a 540 gallon aquarium.
A unique 540 gallon aquarium however. In fact, the first of its kind. I wanted to take two completely separate 130 gallon aquariums, use both of their front and back long panels, and create as single large square aquarium.
Sounds easy enough right?
These two aquariums were each 6 foot aquariums. I bought them second hand for about $1 a gallon (which is a cheap way to buy big pieces of glass!).
Now that I had my glass, it was time to put this thing together. Now obviously, I had only 4 sides. This tank was to be a tank that was 6’X6’X2’ (2’ tall). I was missing a bottom piece however. Since this tank was going to be in my basement, a 6×6’ bottom glass piece was not only going to be impossible to get down there, but also far too expensive.
So after weigh all of my options and methods to create a bottom for it, I settled on a plywood bottom. I have built plywood/glass aquariums in the past, but never like this.
Ultimately, the key to a plywood aquarium is what you water proof it with. What I water proofed it with is the focus of this article. Why? You will see why if you read on.
First and foremost, there is a plethora of products you could possibly use. Now, some of you may know who I am, while others do not. My real name is Joey Mullen. I am also known as “Uarujoey” or “The king of DIY” on YouTube. I make videos on DIY projects for my YouTube channel, which happens to be the most popular aquarium channel on YouTube.
That creates a bit of pressure for me as you can imagine… thousands would be watching this build. So I wanted to make sure I not only picked the right product, but it also had to meet, if not exceed, my expectations.
I settled on Pond Armor. Why? You already know why… You are on their website right now, almost entirely due to being referred or based on their reputation. That’s what brought me.
What made me actually commit to using it? Well, for starters, the reviews. They are all amazing. More importantly, the price. The price per square foot beats anything else in its class, which is hard to compare, as Pond Shield is in a class of its own.
Then there was the fact that Pond Shield is non-toxic. This is a HUGE importance. We keep pets that cost a lot of money, not to mention, we love them. We need something that is going to be safe.
The color selection Pond Shield comes in is also something unseen. The ability to choose the color I want, instead of using a color that is simply available is a HUGE plus for me. So I was able to make my decision off of these simple points alone. Now the REAL wow factors happened when I received the product and started applying it.
All I did was follow the simple and easy to read instructions that come with the product. In doing so, I was successful with it. I felt it was far easier to apply then I thought it would be. If you can stir a stick, and paint a piece of wood… you can do this!
Ok, so it was easy to use…. what else?
Once applied, I had the option to apply the next coat a short while later, or wait until the next day and sand/apply the second coat. This is a huge plus… I didn’t have to baby sit it. I basically got to pick how quickly I applied it (while following instructions)
After a short while, I had the Pond Shield applied and cured in the required thickness.
Now this was my favorite part. This stuff had a finish that looked and felt like glass! This was a HUGE plus. I could apply suction cups to it if needed, and cleaning it would be a breeze. Not to mention silicone would stick to it after I sand the area I was applying silicone to. And by stick I mean It’s basically permanent! Perfect! I was able to simply silicone my glass panels into place!
At the end of the day there was not a single thing I didn’t like about it. Even when I tried to find some negatives in it, I couldn’t. Although I did drip some on my cement floor, I figured it would be easier to remove cured paint rather than wet (in this case), I simply let it cure which was bad idea. After curing, I couldn’t get the Pond Shield off the floor unless I took a hammer and chisel to it! I ended up removing bits of my cement floor to get it up. So adhesion I guess you could say well, don’t worry about it sticking to whatever you need it to stick to!
Will I use it again? YUP! I won’t only use it, but whenever anyone needs a recommendation on a water proofing agent for their aquarium or pond, you can bet I will be telling them all about Pond Shield.
I hope this is enough to help with your decision whether Pond Shield is right for you or not. If not the product, the customer service you will experience with Pond Armor is world class. Give your fish what they deserve, and you will not regret it!
Pond Armor certainly gets my seal of approval!
Joey Mullen…
AKA “UaruJoey”
You can view my complete tutorial on this build on You Tube


